If you’ve ever renamed a file to “finalv2.js” or “finalv3forreal.js,” you already know the chaos that comes from managing code without a system. This git version control guide is built to fix that. We’ll walk through the fundamentals of Git, the industry-standard tool for tracking and managing changes in software projects. No fluff—just practical steps you can apply immediately to clean up your workflow. More importantly, you’ll learn not just the commands, but the reasoning behind them, so you can use Git confidently whether you’re working solo or collaborating with a full development team.
The “Why”: Understanding Version Control Fundamentals
As you start mastering version control with Git, you might also find it helpful to explore how to effectively run your code with the insights from our article ‘Llekomiss Run Code‘.
At its core, version control is a time machine for your code. It records changes to files over time so you can revisit any saved state later. I learned this the hard way. Early in my career, I overwrote a working feature with a rushed “quick fix” and had no backup. Two days of work vanished. That mistake alone convinced me never to build without version control again.
Why Git Became the Standard
So, what makes Git different? Unlike older centralized systems, Git is distributed. Every developer has a complete copy of the project history. If a server crashes, the project survives. Moreover, Git is fast because most operations happen locally. And then there’s branching: you can create an independent line of development to test a feature without touching stable code. Think of it like parallel universes for your app (minus the sci‑fi chaos).
Core Terminology Explained
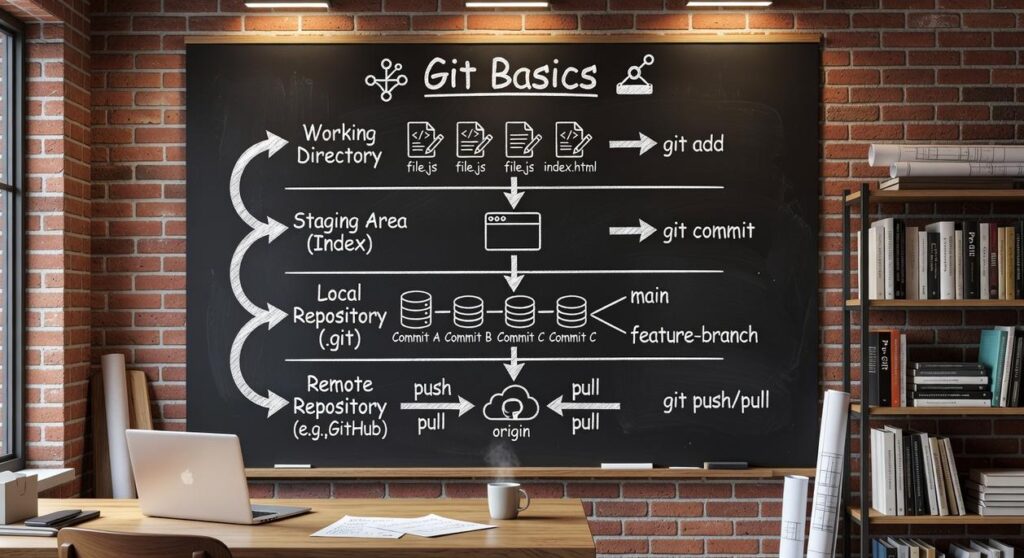
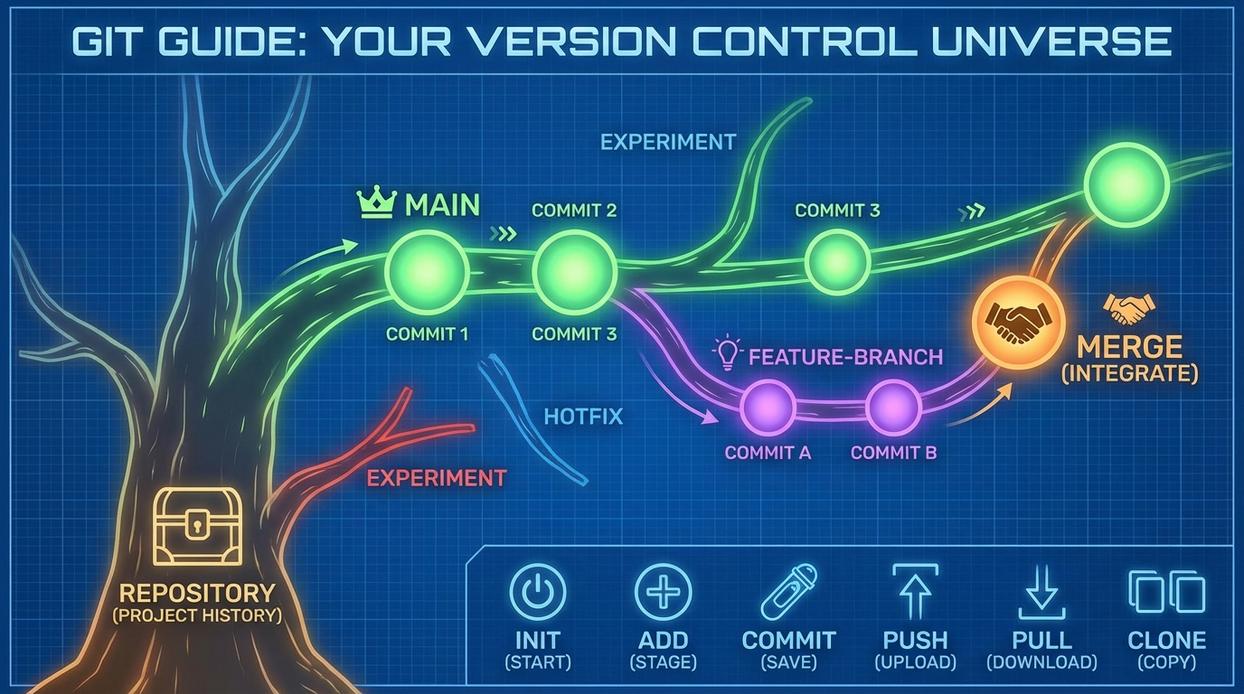
A repository (repo) is the database storing your project files and full revision history. A commit is a snapshot of your repo at a specific moment. A branch is an isolated path for development.
Some argue version control is overkill for small projects. However, even solo developers benefit. One messy rollback taught me that following a solid git version control guide beats trusting your memory every time.
Getting Started: Your First Git Repository
Before you write a single line of code, there’s a small but crucial setup step. Run:
git config --global user.name "Your Name"
git config --global user.email "[email protected]"
This tells Git who you are. Every commit (a saved snapshot of your project at a specific point in time) is tagged with this identity. Some argue this step is optional—especially for solo projects. Technically, Git will still run. However, without proper attribution, collaboration becomes messy fast (and future-you might forget what past-you changed).
Two Ways to Start a Project
First, git init. This command initializes (creates) a new Git repository inside an existing folder.
Step-by-step:
- Navigate to your project folder:
cd my-project - Run
git init - Git creates a hidden
.gitdirectory to track changes.
Alternatively, use git clone [url] when working with an existing remote repository, such as one on GitHub. Cloning downloads the project and its full history. Some developers prefer always cloning, even for new work, to keep everything remote-first. That’s valid—but for local experiments, git init is faster and simpler.
The Staging Area
Now, the most misunderstood concept: the staging area. Think of it as a prep table before serving a meal. You modify files, then use git add to stage them—meaning you’re selecting which changes go into the next commit.
Critics say this extra layer is unnecessary friction. Why not auto-commit everything? Because selective staging gives precision. You can group related changes logically (pro tip: commit small, focused updates).
If you’re exploring broader infrastructure concepts alongside version control, check out demystifying cloud computing models iaas vs paas vs saas.
For a deeper dive, follow a structured git version control guide to reinforce these fundamentals.
The Daily Workflow: Branching, Committing, and Merging
If you take one rule seriously in Git, make it this: almost never commit directly to main.
The Power of Branching
The main branch is your project’s source of truth—the version that (ideally) always works. Committing experimental code straight to it is like editing a live website without a backup (thrilling, but not in a good way).
A branch is an isolated copy of your codebase where you can safely build a feature or fix a bug. Think of it as a parallel timeline. If things go wrong, your main timeline stays untouched.
Some developers argue that small teams can skip branching to “move faster.” In reality, even solo developers benefit. Branching reduces risk, keeps changes organized, and makes collaboration smoother.
Essential Branching Commands
To create a branch:
git branch [name]
To switch to it:
git checkout [name]
Want both in one step?
git checkout -b [name]
That shortcut saves time and prevents the classic mistake of creating a branch but forgetting to switch to it.
Pro tip: Use descriptive names like feature/login-form or fix/navbar-alignment to make your history readable later.
The Commit Cycle
Your daily workflow revolves around three steps:
- Make changes to your files.
- Stage what you want included:
git add [file]- or
git add .
- Commit with a clear message:
git commit -m 'A descriptive message about the change'
A commit is a snapshot of your staged changes. Clear messages matter. Future you will thank present you (especially during late-night debugging).
If you’re following a structured git version control guide, this cycle is the heartbeat of everything else you’ll learn.
Bringing It All Back Together
When your feature is complete:
git checkout maingit merge [feature-branch-name]
This combines your branch’s changes into main.
Handling Merge Conflicts
A merge conflict happens when Git can’t automatically decide which changes to keep. You’ll manually edit the file, choose the correct code, then stage and commit the resolution.
What’s next? Once you’re comfortable here, you’ll likely wonder about rebasing, pull requests, and remote repositories. Master this workflow first—those advanced tools build directly on these fundamentals.
From Theory to Practice: What to Do Next
You set out to understand Git in a practical, usable way—and now you have the foundation to do exactly that. Instead of juggling duplicate files and risking lost progress, you’re equipped with a structured system that tracks every change with confidence.
The real progress starts now. Open your next project and run git init. Create branches. Commit often. Experiment with git log and git stash to strengthen your workflow.
If you want a faster, frustration-free path to mastering Git, follow our git version control guide—trusted by thousands of developers—and start building smarter today.